
Advantages and Disadvantages of Friction Savers
Are all friction savers created equally? Do all friction savers do the same thing? Well, let's discuss what a friction saver does, what the advantages and disadvantages are, and what are the different kinds? (Ring Friction Savers & Pulley Savers) . Friction savers have been around for quite a while now and are used by some of the most efficient climbers in the world to help make moving through the crown of the tree easier on them and their equipment.
Friction savers were originally brought to the U.S. by a climber that had visited Europe for a tree climbing competition. After seeing how useful they were, he brought the idea back and began spreading their use throughout the industry. The concept is easy enough: they are comprised of a piece of rope with a large ring spliced to one end and a small ring spliced to the other. The friction saver is placed over a limb that is ideal for a tie in point and then the climb line is passed through the small ring first and then the big ring.
This is a very important step that shouldn't be forgotten! Small ring first, then the big ring. Following this rule allows the friction saver to be retrieved once the climb is over. To retrieve the friction saver, all the climber needs to do is place an over hand knot in the terminating end of their climbing line (the end opposite your friction hitch) or, depending on the type of friction saver, put a retrieval ball on the rope or through the eye splice.
Ring Friction Savers
Some friction savers are simply made with a piece of rope of stitched webbing with a large ring and a small ring. These are called ring and ring friction savers. They are very simple in construction and use. In most circumstances, they are simply tossed over a limb and used to reduce the amount of friction at the tie in point. Friction can make going out on limb walks more difficult, as well as ascending back into the tree. It can also create a ton of heat at the tie in point that will in turn transfer to your rope and glaze it. We have all glazed a rope one time or another, right?! By using a ring friction saver at your tie in, rather than the branch union, it actually helps your rope last longer and can reduce the amount of fatigue you would be feeling because of the reduction in friction you would be fighting.
Some other friction savers add in an adjustable prussic with a small ring on it. This adjustable prussic makes the friction saver, you guessed it, adjustable! An adjustable friction saver allows you to do two things:
1. You can decide how close to your tie in point your rings will be. This is very useful when you are working at or near your tie in point because you can raise your tie in point to where it is comfortable to work instead of just settling for a lower tie in point, like you would have with a traditional friction saver.
2. Its ability to be used as a tie in point on a straight spar or log with no limbs. If you adjust the friction saver so the rings are at least 6-8 inches apart and pass your rope through the rings, the friction saver will bite down on the log and allow the climber to come down the tree without the friction saver slipping. It is highly recommended to practice this low to the ground to see how it works and to get a feel for setting it up correctly.
Pulley Savers
Another awesome option in friction savers is the Pulley Saver. The Pulley Saver was developed by the Treemagineers, the same creative minds that brought you the Treemotion harness and the Hitch Climber Pulley. The Pulley Saver consist of a rope with a large eye spliced in it with an insert that keeps the eye open but also allows it to be squished or bent. Next is an adjustable prussic with a Pinto Pulley attached to it. Lastly is another adjustable prussic with a small steel thimble which acts as the retrieval link for the system.
The Pulley Saver is installed by hand once the climber is in the canopy. The spliced eye is passed over a limb and just the Pinto Pulley is passed through the eye. The Pinto Pulley can be adjusted so that it hangs 6 -8 inches below the limb, which is ideal for retrieval. The rope is passed through the retrieval link first, then through the Pinto Pulley and then clipped into your climbing system. Climbing through the canopy is a breeze because of the ease and efficiency of the Pinto Pulley.
When the time comes for retrieval, the included retrieval ball in girthed onto your spliced eye or the terminating end of your climb line and pulled into the tree, through the Pinto Pulley and then catches on the retrieval link which pulls the Pinto Pulley through the eye splice and sends everything to the ground. The eye splice has a much higher success rate for retrieval than typical friction savers with large steel or aluminum rings.
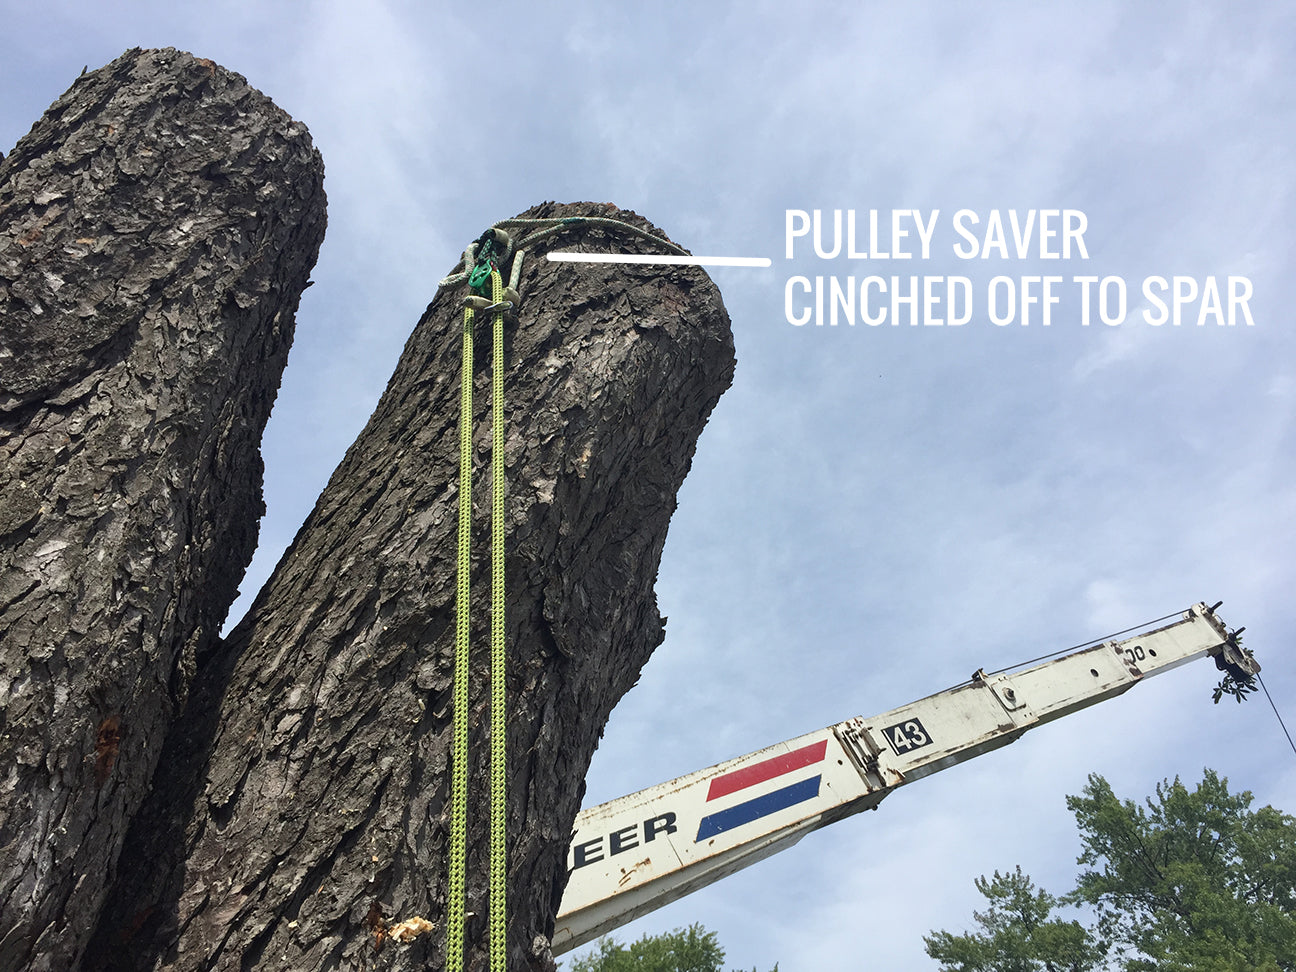
The other really cool trick with a Pulley Saver is passing the Pinto Pulley and prussic through the eye splice so it cinches down around the spar. This creates a tie in point when one doesn't exist, which makes you a safer climber instead of cutting a false crotch into the tree and risking your rope slipping out and you crashing to the ground. This configuration is extremely useful when doing crane removals where tie in points aren't always where you want them to be.
Disadvantages of Friction Savers
One disadvantage of friction savers is their ability to get stuck when trying to retrieve them after all your climbing is done. As you all know, this is pretty much the worst time for anything to get stuck in the tree, but it is a risk that should be discussed. One of the best ways to keep a traditional friction saver from getting stuck is to choose your tie in point wisely. Look for crotches that are wide open and allow for a clean removal. Though this may seem obvious, don't leave ANY stubs near the friction saver or the large ring WILL get caught on it! This has miraculously happened more than once.
As for the Pulley Saver, always make sure the Pinto Pulley is free-hanging below the crotch instead of cinched up close to it. If you are using it in a cinched setting, let the Pinto hang a couple inches below the eye splice as this will help it pass through the eye on retrieval. Lastly, keep the retrieval link as far away from the Pinto Pulley as possible as it can get sucked into the pulley and create gouges if it is set too close.
We highly recommend climbing with a friction saver, whether that is a traditional or a Pulley Saver to help reduce wear on your rope and body. Try out a friend's setup, check out our YouTube (https://www.youtube.com/watch?v=UzX_eTZ-ME4), or come up to the shop in Marlette, Michigan and we will show you how they work! Explore our collection of friction savers to find which one fits best with your climbing style and needs. Climb safe!
Leave a comment