Using the Single Up, Double Down Technique
Whoa, whoa pump the brakes!!! What’s single up, double down? and why should I look into it? Well, let’s do somewhat of a deep dive on this climbing technique.
I can personally vouch for this killer way of ascending into the tree! I know first-hand how physically demanding tree climbing can be. There are days you might be climbing up on an M.R.S. system 50 feet to get to the first limb, and that’s just to get you up there! Now you have to start moving through the canopy with acrobatic moves to complete that tree. But wait--you might still have to more jobsites that may have trees just as tall with twice as much work!
There’s nothing wrong with hip thrusting to ascend the tree, but there is a simpler way of getting up there.
How I Met the Single Up, Double Down Technique
Back a couple years ago when I first hopped into the tree industry it was a straight up traditional closed system with absolutely no hardware, just rope on rope to get the job complete. Let me tell you though, when I had multiple Oaks to prune out in a day, I would be about spent with very little energy to do anything after work! Aside from having minimal energy at the end of the day, everything worked out pretty well. This was just the way I was taught to climb, my teachers at the time weren’t shown otherwise and we did what we could with what little gear we had. It was the only way we knew how to get access into the canopy. Things changed for me when I attended my first Tree EXPO, I walked onto the showroom floor and was completely overwhelmed with uber amounts of excitement that it felt as if I was going to pass out. Have I mentioned how much of a gearhead I am!? That’s where I met some of the coolest people in my life, who were willing to share their knowledge with me!

Can you guess the technique I was shown that day? Well, if you guessed single up, double down, then you are correct.
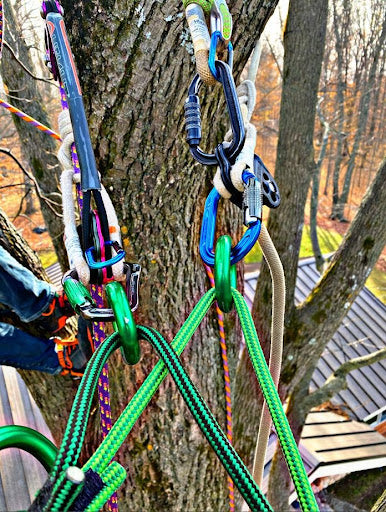
This technique involves using the Hitch Climber System which consists of a DMM Hitch Climber Pulley, a prussik, two carabiners and that would be the starting point for the Double Down portion. For the Single up portion incorporate a rope wrench with tether, a chest harness with a DMM XSRE carabiner and at minimum a foot ascender (the most popular model that people tend to get has be the CT Foot Ascender). If you truly wanted the smoothest ride up, then I would strongly suggest adding a HAAS Knee Ascender. Now I know it sounds a bit more gear heavy than what you may be used to, but your body will thank you at the end of the day. Bear with me a bit more as we begin our incredible journey on how to use this system as a whole.
How to Use Single Up, Double Down
First thing to do would be to isolate a solid Tie in point (T.I.P.) with a throwline setup, patience is key when working with throwline. Once your T.I.P. is isolated and the climb line is set in position, hit a two-man load test by holding and pulling down on both legs of rope gently using both, if there is wild erratic movement or an unsettling noise coming from that T.I.P. then it would be best to re-shoot for another T.I.P. If the load test proves to be a success, tie on a Running Bowline with a Yosemite backup and send it up to choke on the tree. By doing this you’ve created a sick Canopy Anchor but non-retrievable. Slap together your awesome Hitch Climber System onto the rope and add the rope wrench into the mix. Boom that’s another step checked off the list! Clip into your system, connect both your ascenders (if you have both knee and foot ascenders), begin your ascent into the canopy and you’ll immediately notice how much easier climbing just got. Instead of using brute strength, you will be incorporating your leg muscles with this system.

Let’s fast forward a bit and move onto reaching your Canopy Anchor and transferring over to an M.R.S. or as the name of this blog refers to it, “Double Down.” Begin by securing yourself to the tree using your work positioning lanyard. Having done so you’re free to untie your Running Bowline that was backed with a Yosemite and install your friction saver over the spar. Run your rope through the friction saver as normal. No need to remove the rope wrench from the climbing system, but there is something that has to be done to it and that would involve flipping the rope wrench head from the moving leg of rope over to the stationary leg, which would be the returned spliced eye leg of rope. If the rope wrench is left above the hitch cord on an M.R.S. system an increase of friction will be seen and may affect the smoothness of the climb.

This technique I found to be effective for those tall winter Oak climbs or for those that wish to break into the S.R.S. scene and are getting a feel for how the system actually works. Being honest here, there is a slight learning curve to it but, it’s never too late to try new climbing techniques! Drop on down to the comments let us know what you think of this climbing technique. Has this helped you along your career or are you a Blake’s hitch and ride kind of person? We like hearing from everybody!
Leave a comment